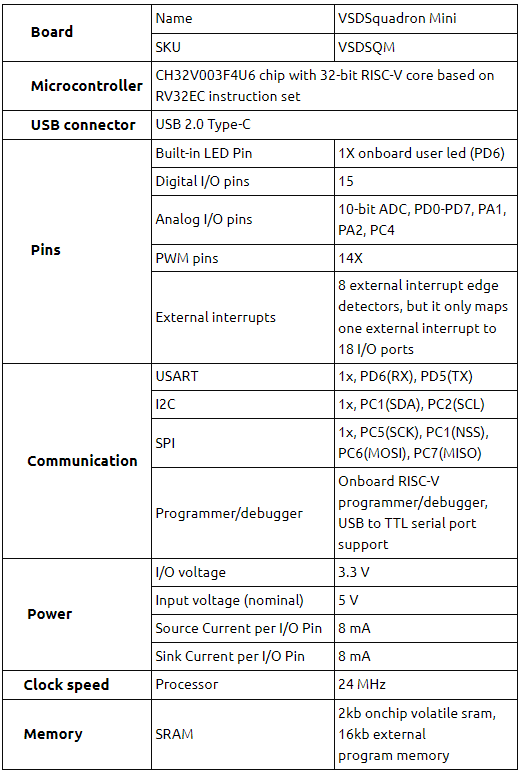
Overview
In this project, we build a system that utilizes CH32V003 RISC-V processor and the Arduino IOT cloud to convert traditional home appliances into IoT-enabled devices. The system incorporates the ESP32 for its built-in Wi-Fi and Bluetooth capabilities. When the user sends an ON/OFF command through the Arduino IOT cloud app/web application, the signal is transmitted to the ESP32 via Wi-Fi, which then activates a GPIO port in the VSDsquardron mini. This signal controls a servo motor connected to the VSDsquadron mini, allowing for remote operation of the home appliances. By integrating the Arduino IOT cloud with the CH32V003 RISC-V processor and ESP32, users can conveniently manage their appliances from anywhere using a smartphone or tablet. This enhances user convenience, improves energy efficiency by enabling remote power management, and adds a layer of automation to household tasks. Additionally, the use of IoT technology increases the versatility and functionality of conventional home appliances, aligning them with modern smart home standards.
Components Required
- CH32V003X
- ESP32
- Servo Motors (SG90)
- Jumper Wires
The CH32V003 RISC-V processor, employed in this project, operates at voltages between 1.8V to 3.6V, featuring GPIO pins for interfacing with external devices and supporting communication protocols like SPI, I2C, and UART. The ESP32 utilized in the system typically operates at 3.3V or 5V, acting as interface to connect to the cloud making use of its built in WIFI capabilities. The servo motor (SG90), integral to the project, operates within a voltage range of 4.8V to 6V and responds to PWM signals for position control, drawing current proportional to load and torque requirements. These electrical properties ensure compatibility and effective integration of components, facilitating the automated operation of home appliances.
Circuit Connection:
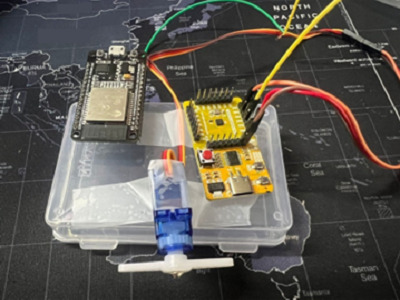
The servo motor is connected to the CH32V003 processor as follows: The control pin (usually marked as PWM) of the servo motor, which receives PWM signals to control its position, is connected to the PD2 pin of the CH32V003 processor. Additionally, the VCC pin of the servo motor is connected to the appropriate voltage supply pin (VCC) on the processor, while the GND pin of the motor is connected to the ground pin (GND) of the processor. This setup allows the CH32V003 processor to send PWM signals to the servo motor via the PD4 pin, thereby controlling its rotation and enabling the automated ON/OFF action required.
The ESP32 is connected to PD2 pin of VSDsquadron mini from pin D4. ESP32 receives the command over Wi-Fi which in turn tells us to turn on/off the devices. This command is passed as a Boolean signal from ESP to VSDsquadron mini over this connection. This signal in turn acts as input for the servo motor indicating either to switch ON/OFF.
Pinout Diagram for Smart Door:
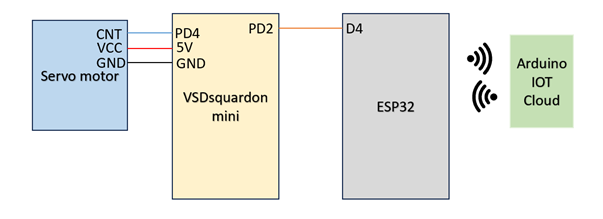
Table for Pin connection:
| Servo Motor (SG90) | CCH32V003x |
|---|---|
| VCC (Red Wire) | VIN |
| PWM (Blue Wire) | PD4 |
| GND (Black Wire) | GND |
| ESP32 | CH32V000x |
|---|---|
| D4 | PD2 |
How to Program:
We program the VSDsquadron mini using Arduino IDE as we also use Arduino IDE for programming ESP32. It should be noted that simpler programs achieved through Arduino IDE consumes more memory. For the purpose for streamline, we use Arduino IDE here. The necessary libraries and packages should be installed for running the code. You can refer to this GitHub repo for installing necessary packages for CH32V0003. Similarly install the necessary packages for ESP32 in the Arduino IDE.
The below code block configures the pins of VSDsquardon mini. Pin PD4 is servo pin connected to control pin of servo motor. PD2 is the configured as input pin.
#defineSERVO_PIN PD4
#defineINPUT_PIN PD2

voidsetup()
{
  pinMode(SERVO_PIN, OUTPUT);
  pinMode(INPUT_PIN, INPUT);
  digitalWrite(SERVO_PIN, LOW); // Set the initial position of the servo to 90 degrees
}
This function initializes the PWM output to control the servo motor. The loop function is constantly looking for change in pin PD2(input pin). If the we receive high on the input pin, the enter a loop which controls the PWM to make the servo rotate from its initial position of 90 deg to 150 deg and back to its initial position of 90 degrees. If the previous state was high and the input pin changes to low, the servo enters a loop which uses PWM to make it rotate from 90 deg to 10 deg and back to its initial position of 90 degrees.
voidloop()
{
  staticboolprevInputState = LOW; // Variable to store the previous state of the input pin

  // Read the current state of the input pin
  boolcurrentInputState = digitalRead(INPUT_PIN);

  // Check if the input pin transitioned from LOW to HIGH
  if(currentInputState == HIGH &&prevInputState == LOW){
    // Sweep the servo from 90 to 150 degrees
    for(int angle = 90; angle <= 150; angle++){
      intpulseWidth = map(angle, 0, 180, 500, 2500); // Map the angle to the PWM pulse width
      digitalWrite(SERVO_PIN, HIGH);
      delayMicroseconds(pulseWidth);
      digitalWrite(SERVO_PIN, LOW);
      delay(15);
    }

    // Return the servo to the initial position (90 degrees)
    digitalWrite(SERVO_PIN, HIGH);
    delayMicroseconds(1500); // Set the pulse width for 90 degrees
    digitalWrite(SERVO_PIN, LOW);
    delay(15);
  }

  // Check if the input pin transitioned from HIGH to LOW
  if(currentInputState == LOW &&prevInputState == HIGH){
    // Sweep the servo from 90 to 30 degrees
    for(int angle = 90; angle >= 10; angle--){
      intpulseWidth = map(angle, 0, 180, 500, 2500); // Map the angle to the PWM pulse width
      digitalWrite(SERVO_PIN, HIGH);
      delayMicroseconds(pulseWidth);
      digitalWrite(SERVO_PIN, LOW);
      delay(15);
    }

    // Return the servo to the initial position (90 degrees)
    digitalWrite(SERVO_PIN, HIGH);
    delayMicroseconds(1500); // Set the pulse width for 90 degrees
    digitalWrite(SERVO_PIN, LOW);
    delay(15);
  }
The below code is for setting up the ESP32 for it to work via wifi. This code block is for setting up the required header files for creating the necessary parameters to setup the Arduino “thing”.
#include<ArduinoIoTCloud.h>
#include<Arduino_ConnectionHandler.h>

constchar DEVICE_LOGIN_NAME[]  = ;

constcharSSID[]               = ;    // Network SSID (name)
constcharPASS[]               = ;    // Network password (use for WPA, or use as key for WEP)
constchar DEVICE_KEY[]  = ;    // Secret device password

voidonButtonChange();

bool button;

voidinitProperties(){

  ArduinoCloud.setBoardId(DEVICE_LOGIN_NAME);
  ArduinoCloud.setSecretDeviceKey(DEVICE_KEY);
  ArduinoCloud.addProperty(button, READWRITE, ON_CHANGE, onButtonChange);

}

WiFiConnectionHandlerArduinoIoTPreferredConnection(SSID, PASS);
The “thingProperties” contains all the necessary parameters to setup the system to work via cloud like the device name, SSID for the network you are using to connect through Wi-Fi, the network password and the secret key that is created when setting up the Arduino “Thing”. The setup function configures the pin 4 as output which will be connected to the VSDsquadron mini. The baud rate is set to 9600. The onButtonChange function looks for the state of the button variable which is virtual pin created using Arduino “THING”. If we get high on, it sets the output pin 4 as high.
#include"thingProperties.h"

voidsetup(){
  // Initialize serial and wait for port to open:
  Serial.begin(9600);
  pinMode(4,OUTPUT);
  // This delay gives the chance to wait for a Serial Monitor without blocking if none is found
  delay(1500);

  // Defined in thingProperties.h
  initProperties();

  // Connect to Arduino IoT Cloud
  ArduinoCloud.begin(ArduinoIoTPreferredConnection);

  /*
     The following function allows you to obtain more information
     related to the state of network and IoT Cloud connection and errors
     the higher number the more granular information you’ll get.
     The default is 0 (only errors).
     Maximum is 4
 */
  setDebugMessageLevel(2);
  ArduinoCloud.printDebugInfo();
}

voidloop(){
  ArduinoCloud.update();
  // Your code here


}

/*
  Since Button is READ_WRITE variable, onButtonChange() is
  executed every time a new value is received from IoT Cloud.
*/
voidonButtonChange()  {
  // Add your code here to act upon Button change
  if(button == 1){
    digitalWrite(4,HIGH);
  }
  else{
    digitalWrite(4,LOW);
  }
}
System setup – Working
In our home automation project utilizing the CHV320003 system, servo motors play a pivotal role in enabling precise and automated control over various household devices. When we receive a high signal on input pin PD2 on VSDsquadron mini, it acts as control signal to indicate the servo motor to turn ON the home appliance switch where, the servo motor goes from its initial position of 90 degrees to 150 degrees and back to its initial position of 90 degrees.When we encounter a low signal on the input pin given that the pin was in high state before, the servo goes from its initial position of 90 degrees to 10 degrees and back to 90 degrees. This completes the switch OFF action in traditional home appliances. Both the high and low signals to the input pin in VSDsquadron comes from ESP32 which is connected to the cloud using the built in Wi-Fi functionality. The ON/OFF is performed either with the Arduino IOT web application or the mobile application. This whole system coverts your traditional home appliances into IOT enabled home appliances.
VSDsquadron mini – Code
#defineSERVO_PIN PD4
#defineINPUT_PIN PD2

voidsetup(){
  pinMode(SERVO_PIN, OUTPUT);
  pinMode(INPUT_PIN, INPUT);
  digitalWrite(SERVO_PIN, LOW); // Set the initial position of the servo to 90 degrees
}

voidloop(){
  staticboolprevInputState = LOW; // Variable to store the previous state of the input pin

  // Read the current state of the input pin
  boolcurrentInputState = digitalRead(INPUT_PIN);

  // Check if the input pin transitioned from LOW to HIGH
  if(currentInputState == HIGH &&prevInputState == LOW){
    // Sweep the servo from 90 to 150 degrees
    for(int angle = 90; angle <= 150; angle++){
      intpulseWidth = map(angle, 0, 180, 500, 2500); // Map the angle to the PWM pulse width
      digitalWrite(SERVO_PIN, HIGH);
      delayMicroseconds(pulseWidth);
      digitalWrite(SERVO_PIN, LOW);
      delay(15);
    }

    // Return the servo to the initial position (90 degrees)
    digitalWrite(SERVO_PIN, HIGH);
    delayMicroseconds(1500); // Set the pulse width for 90 degrees
    digitalWrite(SERVO_PIN, LOW);
    delay(15);
  }

  // Check if the input pin transitioned from HIGH to LOW
  if(currentInputState == LOW &&prevInputState == HIGH){
    // Sweep the servo from 90 to 30 degrees
    for(int angle = 90; angle >= 10; angle--){
      intpulseWidth = map(angle, 0, 180, 500, 2500); // Map the angle to the PWM pulse width
      digitalWrite(SERVO_PIN, HIGH);
      delayMicroseconds(pulseWidth);
      digitalWrite(SERVO_PIN, LOW);
      delay(15);
    }
    // Return the servo to the initial position (90 degrees)
    digitalWrite(SERVO_PIN, HIGH);
    delayMicroseconds(1500); // Set the pulse width for 90 degrees
    digitalWrite(SERVO_PIN, LOW);
    delay(15);
  }
   // Update the previous input state
  prevInputState = currentInputState;
}
ESP32 Code
#include"thingProperties.h"

voidsetup(){
  // Initialize serial and wait for port to open:
  Serial.begin(9600);
  pinMode(4,OUTPUT);
  // This delay gives the chance to wait for a Serial Monitor without blocking if none is found
  delay(1500);

  // Defined in thingProperties.h
  initProperties();

  // Connect to Arduino IoT Cloud
  ArduinoCloud.begin(ArduinoIoTPreferredConnection);
  setDebugMessageLevel(2);
  ArduinoCloud.printDebugInfo();
}

voidloop(){
  ArduinoCloud.update();
  // Your code here

 }
/*
  Since Button is READ_WRITE variable, onButtonChange() is
  executed every time a new value is received from IoT Cloud.
*/
voidonButtonChange()  {
  // Add your code here to act upon Button change
  if(button == 1){
    digitalWrite(4,HIGH);
  }
  else{
    digitalWrite(4,LOW);
  }
}
Application video:
Here is the demonstration of the application