Team RISC-y Business
- Swetha Murali
- PVS Sukeerthi
About
An authentication system using LiFi technology based on duration of light emission.
Introduction
Most lockers today have a single layer of protection such as a keypad or padlock. This can lead to potential security breaches and theft. We propose a simple multi-step authentication protocol for lockers that can ensure protection without the need for excessive hardware/software equipment. Our idea uses LiFi technology and a simple smartphone app to unlock the locker.
Overview
When the app is opened, the user is prompted to verify their biometrics and/or enter a security pin. The authentication method and pin can be set by the user while locking the locker. If authentication is successful, the app switches on the flashlight for a secret fixed amount of time. This duration is precise to the millisecond and hence cannot be replicated manually. The sensor detects this light and opens the locker only if the duration matches exactly. This makes the locker secure as well as cost-effective.
Components Required
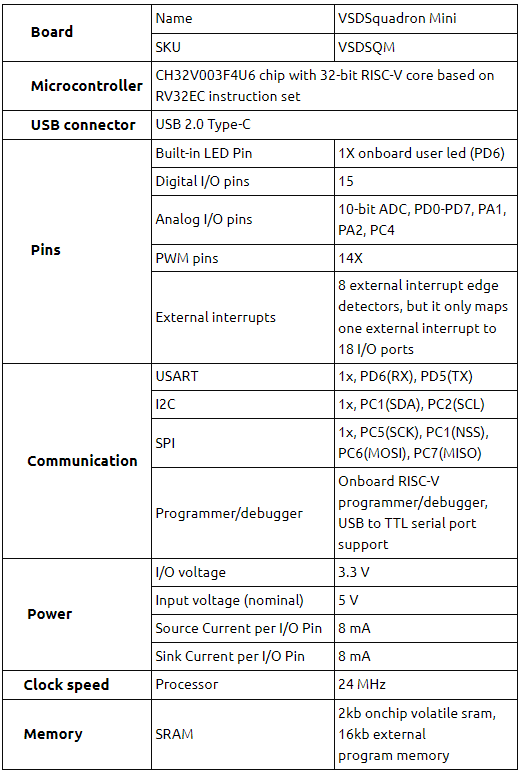
- VSDSquadron Mini board
- 2 LEDs (for indicating locked/unlocked state)
- 470 ohm resistor
- LDR module
- 12V power source
- Servomotor
- Piezo Buzzer
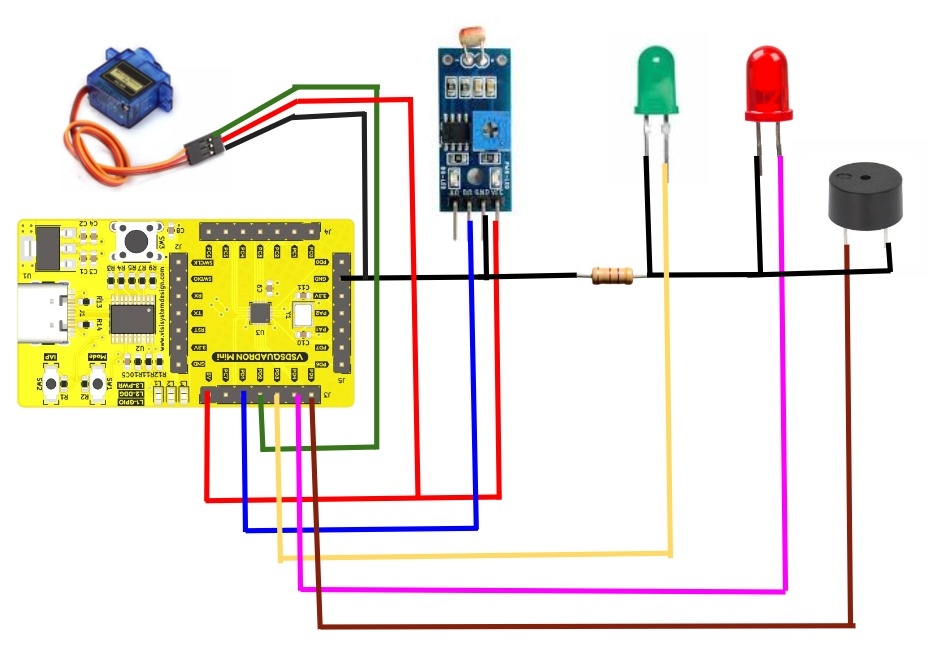
Circuit Connection Diagram

Table of Pin Connections
| LDR Module | VSDSquadron Mini |
|---|---|
| D0 | PD1 |
| VCC | 5V |
| GND | GND |
| Servomotor | VSDSquadron Mini |
|---|---|
| Signal | PD2 |
| VCC | 5V |
| GND | GND |
| VSDSquadron Mini | |
|---|---|
| PD3 | +ve terminal of green LED |
| PD4 | +ve terminal of red LED |
| PD5 | +ve terminal of piezo buzzer |
Demo
Correct Duration
Incorrect Duration
Code
#include <ch32v00x.h>
#include <debug.h>
#include <stdio.h>
#include <string.h>
#include "debug.h"

#define PWM_MODE1 0
#define PWM_MODE2 1
#define PWM_MODE PWM_MODE2
#define GPIO_PORT GPIOD
#define BUZZER GPIO_Pin_5
#define RED_LED GPIO_Pin_4
#define GREEN_LED GPIO_Pin_3
#define SERVO_PIN GPIO_Pin_2
#define LDR_PIN GPIO_Pin_1
#define CLOCK_ENABLE RCC_APB2PeriphClockCmd(RCC_APB2Periph_GPIOD, ENABLE)

void NMI_Handler(void) __attribute__((interrupt("WCH-Interrupt-fast")));
void HardFault_Handler(void) __attribute__((interrupt("WCH-Interrupt-fast")));
void Delay_Init(void);
void Delay_Ms(uint32_t n);

void TIM1_PWMOut_Init(u16 arr, u16 psc, u16 ccp) {
    GPIO_InitTypeDef GPIO_InitStructure={0};
    TIM_OCInitTypeDef TIM_OCInitStructure={0};
    TIM_TimeBaseInitTypeDef TIM_TimeBaseInitStructure={0};

    RCC_APB2PeriphClockCmd( RCC_APB2Periph_GPIOD, ENABLE );
    GPIO_InitStructure.GPIO_Pin = GPIO_Pin_2;
    GPIO_InitStructure.GPIO_Mode = GPIO_Mode_AF_PP;
    GPIO_InitStructure.GPIO_Speed = GPIO_Speed_10MHz;
    GPIO_Init( GPIOD, &GPIO_InitStructure );

    RCC_APB2PeriphClockCmd( RCC_APB2Periph_TIM1, ENABLE );
    TIM_TimeBaseInitStructure.TIM_Period = arr;
    TIM_TimeBaseInitStructure.TIM_Prescaler = psc;
    TIM_TimeBaseInitStructure.TIM_ClockDivision = TIM_CKD_DIV1;
    TIM_TimeBaseInitStructure.TIM_CounterMode = TIM_CounterMode_Up;
    TIM_TimeBaseInit( TIM1, &TIM_TimeBaseInitStructure);

	#if (PWM_MODE == PWM_MODE1)
		TIM_OCInitStructure.TIM_OCMode = TIM_OCMode_PWM1;

	#elif (PWM_MODE == PWM_MODE2)
		TIM_OCInitStructure.TIM_OCMode = TIM_OCMode_PWM2;

	#endif

    TIM_OCInitStructure.TIM_OutputState = TIM_OutputState_Enable;
    TIM_OCInitStructure.TIM_Pulse = ccp;
    TIM_OCInitStructure.TIM_OCPolarity = TIM_OCPolarity_High;
    TIM_OC1Init( TIM1, &TIM_OCInitStructure );

    TIM_CtrlPWMOutputs(TIM1, ENABLE );
    TIM_OC1PreloadConfig( TIM1, TIM_OCPreload_Disable );
    TIM_ARRPreloadConfig( TIM1, ENABLE );
    TIM_Cmd( TIM1, ENABLE );
}

void open_door() {
	TIM1_PWMOut_Init( 100, 2000-1, 50 );
	GPIO_WriteBit(GPIO_PORT, GREEN_LED, 1);
	GPIO_WriteBit(GPIO_PORT, RED_LED, 0);
	Delay_Ms(7000);
	GPIO_WriteBit(GPIO_PORT, GREEN_LED, 0);
	GPIO_WriteBit(GPIO_PORT, RED_LED, 1);
	TIM1_PWMOut_Init( 100, 2000-1, 75 );
	Delay_Ms(2000);
}

int main(void) {
	NVIC_PriorityGroupConfig(NVIC_PriorityGroup_2);
	SystemCoreClockUpdate();
	Delay_Init();

	GPIO_InitTypeDef GPIO_InitStructure = {0};

	CLOCK_ENABLE;
	GPIO_InitStructure.GPIO_Pin = BUZZER;
	GPIO_InitStructure.GPIO_Mode = GPIO_Mode_Out_PP;
	GPIO_InitStructure.GPIO_Speed = GPIO_Speed_50MHz;
	GPIO_Init(GPIO_PORT, &GPIO_InitStructure);

    GPIO_InitStructure.GPIO_Pin = RED_LED;
	GPIO_InitStructure.GPIO_Mode = GPIO_Mode_Out_PP;
	GPIO_InitStructure.GPIO_Speed = GPIO_Speed_50MHz;
	GPIO_Init(GPIO_PORT, &GPIO_InitStructure);

    GPIO_InitStructure.GPIO_Pin = GREEN_LED;
	GPIO_InitStructure.GPIO_Mode = GPIO_Mode_Out_PP;
	GPIO_InitStructure.GPIO_Speed = GPIO_Speed_50MHz;
	GPIO_Init(GPIO_PORT, &GPIO_InitStructure);

	GPIO_InitStructure.GPIO_Pin = LDR_PIN;
	GPIO_InitStructure.GPIO_Mode =  GPIO_Mode_IPU;
	GPIO_Init(GPIO_PORT, &GPIO_InitStructure);

	uint8_t locked = 0;
	char duration[5] = "";

	GPIO_WriteBit(GPIO_PORT, GREEN_LED, ~locked);
    GPIO_WriteBit(GPIO_PORT, RED_LED, locked);
	int val = GPIO_ReadInputDataBit(GPIOD, LDR_PIN);

	while (val == 0) {
		// Reading from the LDR sensor
	    int val2 = GPIO_ReadInputDataBit(GPIOD, LDR_PIN);
	    char val2Str[5];
        sprintf(val2Str, "%d", val2);
        strcat(duration, val2Str);
		printf("%d", val2);

		// Correct duration
	    if (strcmp(duration, "0001") == 0) {
	    	open_door();
			duration[0] = '\0';
			break;
	    }

		// Too long
		else if (strcmp(duration, "0000") == 0) {
	    	GPIO_WriteBit(GPIO_PORT, BUZZER, 1);
			Delay_Ms(200);
			GPIO_WriteBit(GPIO_PORT, BUZZER, 0);
			duration[0] = '\0';
			break;
	    }

	  	// Too short
	    if (val2 == 1) {
			GPIO_WriteBit(GPIO_PORT, BUZZER, 1);
			Delay_Ms(200);
			GPIO_WriteBit(GPIO_PORT, BUZZER, 0);
	    	duration[0] = '\0';
			break;
	    }

	    Delay_Ms(15);
	}
}

void NMI_Handler(void) {}

void HardFault_Handler(void) {
	while (1) {}
}
https://github.com/swetha3456/RISC-y-Business
Related Posts:
- Water level monitoring and control in water tank
- Bluetooth automated smart access
- Home safety system
- Making a Game Console Using VSDSquadron Mini
- Shape Tomorrow’s Technology Today: ELCIA Hackathon…
- LED Brightness Control Program using PWMLED…
- Soldiers Health Monitoring and GPS Tracking System
- COLORIMETER
- The Future of Chip Design: The Next Generation is…
- Advanced Easy to use Burgler Alarm

