Overview
The project entails enhancing the VSDSquadron-Mini board by integrating Over-The-Air (OTA) programming capabilities facilitated through the NodeMCU 1.0 (ESP-12E) development board. This integration allows for remote firmware updates to be transmitted over Wi-Fi networks, eliminating the need for physical access to the device for programming purposes.
By leveraging the NodeMCU 1.0’s Wi-Fi connectivity and processing power, the VSDSquadron-Mini board can receive firmware updates remotely. This functionality offers significant advantages, particularly in scenarios where accessing the device for manual updates is impractical or impossible.
In essence, the project streamlines the firmware update process, making it more convenient and efficient while maintaining the integrity and security of the update mechanism.
Components Required to build OTA Programmer:
- VSDSquadron-Mini CH32V003F4U6
- ESP8266 NodeMCU 1.0 (ESP-12E)
- Bread Board
- Power Supply
- Jumper Wires
The CH32V003F4U6 RISC-V processor, employed in the OTA programmer project, operates at voltages between 1.8V to 3.6V, featuring GPIO pins for interfacing with external devices and supporting communication protocols like SPI, I2C, and UART. NodeMCU 1.0, utilizing the ESP-12E module, is a versatile development board tailored for IoT applications. With integrated Wi-Fi capabilities and GPIO pins, it offers a compact and powerful platform for rapid prototyping and experimentation in the IoT space. Renowned for its affordability and strong community support, NodeMCU 1.0 simplifies IoT development, enabling users to create connected devices and applications with ease.
Circuit Connection for OTA Programmer:
In this OTA Project, we are using UART protocol to flash the VSDSquadron-Mini (VSDSM) board using NodeMCU. The PD5 (TX) pin of VSDSM is connected to D1(Soft Serial RX) pin of NodeMCU. The PD6 (RX) pin of VSDSM is connected to D2(Soft Serial TX) pin of NodeMCU. The PD0 (External Interrupt) pin of VSDSM, is connected to D5 of NodeMCU. The Gnd of both the boards are connected together. The 5V pin of VSDSM is connected to VIN pin of NodeMCU, which essentially powers it up.
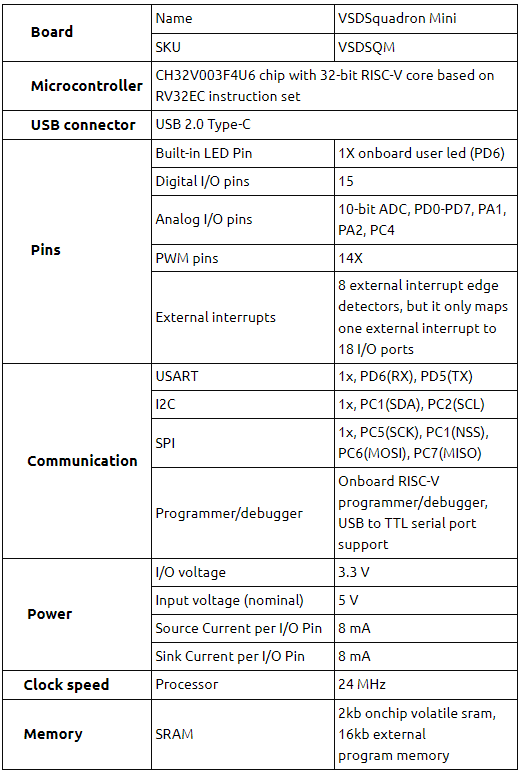
Pinout Diagram for OTA Programmer:
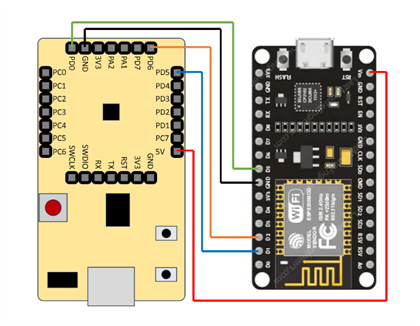
Table for Pin connection:
| VSDSquadron-Mini board | NodeMCU 1.0 (ESP-12E) |
|---|---|
| PD5 (Blue wire) | D1 |
| PD6 (Orange wire) | D2 |
| PD0 (Green wire) | D5 |
| GND (Black wire) | GND |
| 5V (Red wire) | VIN |
Programming Procedure :
CH32V003_IAP Program:
The code given below, is a modification of the CH32V003_IAP example provided by WCH. The main.c file is modified as per the requirements. In the original main.c, it requires PC0 to be floating while programming through UART. The modification is, it does not require any pins, but after booting it will wait for a small amount of time to receive any flashing commands. If it does not receive any commands, the execution is branched to the USER AREA, by calling IAP_2_APP() function. In the Link.ld file, the flash area is set to 1920B, so that this program can fit into the BOOT AREA of the CH32V003, which starts from the address 0x1FFF0000. Only the WCH-LinkUtility program allows us to write this program to address 0x1FFF0000.
// Importing header files
#include "debug.h"
#include "string.h"
#include "iap.h"

// Function which jumps from BOOT area (1920B) to USER area (16K)
void IAP_2_APP(void)
{
RCC_ClearFlag();                        // Clearing all the reset and clock control flags
SystemReset_StartMode(Start_Mode_USER); // Setting the Start mode to USER
NVIC_SystemReset();                     // Performing a System reset
}


int main(void)
{
    // Enable GPIOD,USART1 clock
    RCC->APB2PCENR |= RCC_APB2Periph_GPIOD| RCC_APB2Periph_USART1;

    // Setting the UART baud rate to 38400
    USART1_CFG(38400);

    // A temporary count variable used for creating delay
    u32 count = 0;

    // Loop
while(1)
    {
        // If no data is recieved through UART, keep on counting
while(USART_GetFlagStatus(USART1, USART_FLAG_RXNE) != SET){
            count++;
            // If the count exceeds this threshold, then the execution will be redirected to USER area
if(count >= 3000000){
                IAP_2_APP();
while(1);
            }
        }

        // If the above loop terminates, it means data is recieved through UART
        count = 0;          // Resetting the counter
UART_Rx_Deal();     // Deal with the incoming data
    }
}
Sample Test program:
The code below is a sample test program which is to be uploaded over-the-air. We are using an external interrupt on pin PD0 for detecting the reset signal from the NodeMCU, so that it can boot into the BOOT section for OTA programming. The external interrupt functions are very important for OTA programming, else the CH32V003 will not reset, hence the firmware cannot be updated over the air.
#include "debug.h"

// Initializes GPIO pins for programming
void GPIO_Toggle_INIT(void){
    RCC_APB2PeriphClockCmd(RCC_APB2Periph_GPIOD, ENABLE);
GPIO_InitTypeDefGPIO_InitStructure = {0};
GPIO_InitStructure.GPIO_Pin = GPIO_Pin_3 | GPIO_Pin_4;
GPIO_InitStructure.GPIO_Mode = GPIO_Mode_Out_PP;
GPIO_InitStructure.GPIO_Speed = GPIO_Speed_50MHz;

GPIO_Init(GPIOD, &GPIO_InitStructure);
}

// This function performs System reset with the Start mode BOOT, which
// basically starts the execution from BOOT AREA after the reset.
void APP_2_IAP(void){
RCC_ClearFlag();
SystemReset_StartMode(Start_Mode_BOOT);
NVIC_SystemReset();
}

// *** IMPORTANT ***
// This function initiates the External interrupt functionality to the pin PD0.
// This has to be called in order to detect the reset signal and branch the execution
// to the BOOT AREA for OTA programming
void EXTI0_INT_INIT(void){
GPIO_InitTypeDefGPIO_InitStructure = {0};
EXTI_InitTypeDefEXTI_InitStructure = {0};
NVIC_InitTypeDefNVIC_InitStructure = {0};

    RCC_APB2PeriphClockCmd(RCC_APB2Periph_AFIO | RCC_APB2Periph_GPIOD, ENABLE);
GPIO_InitStructure.GPIO_Pin = GPIO_Pin_0;
GPIO_InitStructure.GPIO_Mode = GPIO_Mode_IPU;
GPIO_Init(GPIOD, &GPIO_InitStructure);

    /* GPIOA ----> EXTI_Line0 */
GPIO_EXTILineConfig(GPIO_PortSourceGPIOD, GPIO_PinSource0);
EXTI_InitStructure.EXTI_Line = EXTI_Line0;
EXTI_InitStructure.EXTI_Mode = EXTI_Mode_Interrupt;
EXTI_InitStructure.EXTI_Trigger = EXTI_Trigger_Falling;
EXTI_InitStructure.EXTI_LineCmd = ENABLE;
EXTI_Init(&EXTI_InitStructure);

NVIC_InitStructure.NVIC_IRQChannel = EXTI7_0_IRQn;
NVIC_InitStructure.NVIC_IRQChannelPreemptionPriority = 0;
NVIC_InitStructure.NVIC_IRQChannelSubPriority = 1;
NVIC_InitStructure.NVIC_IRQChannelCmd = ENABLE;
NVIC_Init(&NVIC_InitStructure);
}

// Main function
int main(void){
NVIC_PriorityGroupConfig(NVIC_PriorityGroup_1);     // Interrupt settings
SystemCoreClockUpdate();                            // Clock settings
Delay_Init();
    EXTI0_INT_INIT();
    #if (SDI_PRINT == SDI_PR_OPEN)
SDI_Printf_Enable();
    #else
USART_Printf_Init(115200);
    #endif
printf("SystemClk:%d\r\n", SystemCoreClock);
printf( "ChipID:%08x\r\n", DBGMCU_GetCHIPID() );
printf("GPIO Toggle TEST\r\n");

GPIO_Toggle_INIT();

while(1){
        // Main code goes here
Delay_Ms(500);
GPIO_WriteBit(GPIOD, GPIO_Pin_4, Bit_SET);
GPIO_WriteBit(GPIOD, GPIO_Pin_3, Bit_RESET);
Delay_Ms(500);
GPIO_WriteBit(GPIOD, GPIO_Pin_4, Bit_RESET);
GPIO_WriteBit(GPIOD, GPIO_Pin_3, Bit_SET);

    }
}

// *** IMPORTANT ***
// This is the external interrupt handler which detects reset signal through PD0
// and branches the execution to BOOT_AREA for OTA programming.
void EXTI7_0_IRQHandler(void) __attribute__((interrupt("WCH-Interrupt-fast")));

void EXTI7_0_IRQHandler(void){
if(EXTI_GetITStatus(EXTI_Line0)!=RESET){
printf("Run at EXTI\r\n");
EXTI_ClearITPendingBit(EXTI_Line0);     /* Clear Flag */
        APP_2_IAP();
    }
}
Before the above program is compiled, ensure that the build output is set to “.bin” instead of “.hex”, as bin files take less space, hence can be uploaded over the air quickly. Afte r the compilation the the bin file is successfully generated.
NodeMCU Sketch file:
#include <ESP8266WiFi.h>
#include <WiFiClient.h>
#include <ESP8266WiFiMulti.h>
#include <ESP8266mDNS.h>
#include <ESP8266WebServer.h>
#include <SoftwareSerial.h>
#include <FS.h>   // Include the SPIFFS library

#define VSD_RESET_PIN D5
SoftwareSerialmySerial(D1,D2);   // RX , TX

ESP8266WiFiMulti wifiMulti;     // Create an instance of the ESP8266WiFiMulti class, called 'wifiMulti'
ESP8266WebServer server(80);    // Create a webserver object that listens for HTTP request on port 80

File fsUploadFile;              // a File object to temporarily store the received file
String file_name = "";

byte data[] = {
  0x57,   // Uart_Sync_Head1
  0xab,   // Uart_Sync_Head2
  0x83,   // IAP end command
  0x00,   // length
  0x00,   // Rev 0
  0x00,   // Rev 1
  0x83   // Checksum
};

byte data2[] = {
  0x57,   // Uart_Sync_Head1
  0xab,   // Uart_Sync_Head2
  0x81,   // IAP chip erase command
  0x00,   // length
  0x00,   // Rev 0
  0x00,   // Rev 1
  0x81   // Checksum
};

byte data3[64];

byte checksum = 0;

String getContentType(String filename); // convert the file extension to the MIME type
bool handleFileRead(String path);       // send the right file to the client (if it exists)
void handleFileUpload();                // upload a new file to the SPIFFS

void setup() {
Serial.begin(115200);         // Start the Serial communication to send messages to the computer
mySerial.begin(38400);
pinMode(VSD_RESET_PIN, OUTPUT);
pinMode(D0, OUTPUT);

digitalWrite(D0, HIGH);
digitalWrite(VSD_RESET_PIN, HIGH);
delay(10);
Serial.println('\n');

wifiMulti.addAP("your_ssid", "your_password");   // add Wi-Fi networks you want to connect to

Serial.println("Connecting ...");
  int i = 0;
  while (wifiMulti.run() != WL_CONNECTED) { // Wait for the Wi-Fi to connect
delay(1000);
Serial.print(++i); Serial.print(' ');
  }
Serial.println('\n');
Serial.print("Connected to ");
Serial.println(WiFi.SSID());              // Tell us what network we're connected to
Serial.print("IP address:\t");
Serial.println(WiFi.localIP());           // Send the IP address of the ESP8266 to the computer

  if (MDNS.begin("esp8266")) {              // Start the mDNS responder for esp8266.local
Serial.println("mDNS responder started");
  } else {
Serial.println("Error setting up MDNS responder!");
  }

SPIFFS.begin();                           // Start the SPI Flash Files System

server.on("/upload", HTTP_GET, []() {                 // if the client requests the upload page
    if (!handleFileRead("/upload.html"))                // send it if it exists
server.send(404, "text/plain", "404: Not Found"); // otherwise, respond with a 404 (Not Found) error
  });

server.on("/upload", HTTP_POST,                       // if the client posts to the upload page
    [](){},
handleFileUpload                                    // Receive and save the file
  );

server.onNotFound([]() {                              // If the client requests any URI
    if (!handleFileRead(server.uri()))                  // send it if it exists
server.send(404, "text/plain", "404: Not Found"); // otherwise, respond with a 404 (Not Found) error
  });

server.on("/list", handleFileList);
server.on("/flash_vsd", handleFileName);

server.begin();                           // Actually start the server
Serial.println("HTTP server started");
}

void loop() {
server.handleClient();
}

void handleFileName(){
file_name = "/" + server.arg("file_name");
//  server.send(200,"text/plain", file_name);
server.send(200, "text/plain", file_name + " is being flashed. Please do not refresh the browser.");
delay(2000);
flash_file();
}

// Handle File lists
void handleFileList(){
  String path = "/";
  uint8_t count = 0;
  Dir dir = SPIFFS.openDir(path);
  String output = "<!DOCTYPE html>";
  output += "<html><head><title> Files </title></head><body>";
  output += "<h3>Select a file to flash :</h3>";
  output += "<form method=\"get\" action=\"/flash_vsd\">";
  while(dir.next()){
    File entry = dir.openFile("r");
if(String(entry.name()).substring(1).endsWith(".bin")){
      count += 1;

      output += "<input type=\"radio\" id=\"file"+ String(count)+"\" name=\"file_name\" value=\"";
      output += String(entry.name()).substring(1);
      output += "\">";
      output += "<label for=\"file"+ String(count) +"\"> " + String(entry.name()).substring(1)+ "</label><br>";
    }
entry.close();
  }

  output += "<input type=\"submit\" value=\"Submit\"></form></body></html>";
server.send(200, "text/html", output);
}

String getContentType(String filename) { // convert the file extension to the MIME type
  if (filename.endsWith(".html")) return "text/html";
  else if (filename.endsWith(".css")) return "text/css";
  else if (filename.endsWith(".js")) return "application/javascript";
  else if (filename.endsWith(".ico")) return "image/x-icon";
  else if (filename.endsWith(".gz")) return "application/x-gzip";
  return "text/plain";
}

bool handleFileRead(String path) { // send the right file to the client (if it exists)
Serial.println("handleFileRead: " + path);
  if (path.endsWith("/")) path += "index.html";          // If a folder is requested, send the index file
  String contentType = getContentType(path);             // Get the MIME type
  String pathWithGz = path + ".gz";
  if (SPIFFS.exists(pathWithGz) || SPIFFS.exists(path)) { // If the file exists, either as a compressed archive, or normal
    if (SPIFFS.exists(pathWithGz))                          // If there's a compressed version available
      path = pathWithGz;                                      // Use the compressed verion
    File file = SPIFFS.open(path, "r");                    // Open the file
size_t sent = server.streamFile(file, contentType);    // Send it to the client
file.close();                                          // Close the file again
Serial.println(String("\tSent file: ") + path);
    return true;
  }
Serial.println(String("\tFile Not Found: ") + path);   // If the file doesn't exist, return false
  return false;
}

void handleFileUpload(){ // upload a new file to the SPIFFS
HTTPUpload& upload = server.upload();
if(upload.status == UPLOAD_FILE_START){
    String filename = upload.filename;
    if(!filename.startsWith("/")) filename = "/"+filename;
Serial.print("handleFileUpload Name: "); Serial.println(filename);
fsUploadFile = SPIFFS.open(filename, "w");            // Open the file for writing in SPIFFS (create if it doesn't exist)
  } else if(upload.status == UPLOAD_FILE_WRITE){
    if(fsUploadFile)
fsUploadFile.write(upload.buf, upload.currentSize); // Write the received bytes to the file
  } else if(upload.status == UPLOAD_FILE_END){
    if(fsUploadFile) {                                    // If the file was successfully created
fsUploadFile.close();                               // Close the file again
Serial.print("handleFileUpload Size: "); Serial.println(upload.totalSize);
server.sendHeader("Location","/success.html");      // Redirect the client to the success page
server.send(303);
    } else {
Serial.println("File upload failed");
server.send(500, "text/plain", "500: couldn't create file");
    }
  }
}

// Chip erase command
void iap_chip_erase() {
Serial.println("Starting Chip erase command");
Serial.println("Sending commands");
for(int i = 0; i< 7; i++){
mySerial.write(data2[i]);
Serial.print(data2[i],HEX);
Serial.print(" ");
delay(50);
  }
Serial.println();
delay(100);
Serial.print("Response: ");
  if (mySerial.available())
Serial.print(mySerial.read());
Serial.println("\nChip erase command successful !");
}

// IAP Program command
void iap_program() {
Serial.println("Starting Chip program command");
Serial.println("Sending commands");
mySerial.write(0x57); delay(50);
mySerial.write(0xab); delay(50);

mySerial.write(0x80); delay(50);  // cmd
mySerial.write(0x40); delay(50);  // len
mySerial.write((byte) 0x00); delay(50);  // rev0
mySerial.write((byte) 0x00); delay(50);  // rev1

  checksum = 0x80 + 0x40;
for(int i = 0; i< 64; i++){
mySerial.write(data3[i]);
Serial.print(data3[i], HEX);
Serial.print(" ");
    checksum += data3[i];
  }

  // Send checksum
mySerial.write(checksum);
Serial.println();
Serial.print("Checksum: ");
Serial.println(checksum, HEX);

delay(200);

Serial.print("Response: ");
  if (mySerial.available())
Serial.print(mySerial.read());

Serial.println("\nChip program command successful !");

}

// IAP end command
void iap_end(){
Serial.println("Starting IAP end command");
Serial.println("Sending commands");
for(int i = 0; i< 7; i++){
mySerial.write(data[i]);
Serial.print(data[i],HEX);
Serial.print(" ");
  }
Serial.println();
delay(100);
Serial.print("Response: ");
  if (mySerial.available())
Serial.print(mySerial.read());

Serial.println("\nIAP end command successful !");
}

// Resetting the VSDSM board
void reset_vsdsm(){
Serial.println("Resetting VSDSquadron-Mini board");
digitalWrite(VSD_RESET_PIN, LOW);
delay(500);
digitalWrite(VSD_RESET_PIN, HIGH);
Serial.println("Done resetting");
}

// Flash
void flash_file(){
digitalWrite(D0, LOW);
  File file = SPIFFS.open(file_name, "r");
  if(!file){
Serial.println("Failed to open file for reading");
iap_end();
      return;
  }

Serial.println("\nClearing RX buffer");
delay(1000);
while(mySerial.available() > 0)
Serial.println(mySerial.read());
reset_vsdsm();
delay(250);
iap_chip_erase();
delay(250);

Serial.println();
  uint32_t count = 0;
  while(file.available()){
for(int i = 0; i< 64; i++){
      data3[i] = (file.available()) ? file.read() : 0xFF;
    }
iap_program();
  }
file.close();

delay(250);
iap_end();
digitalWrite(D0, HIGH);
delay(500);

server.sendHeader("Location","/success2.html");      // Redirect the client to the success page
server.send(303);
}
The above sketch basically sets up a Web server, where the client can upload the files to be flashed on VSDSM and send flash commands. It allows us to save multiple flash files using SPIFFS, which allows us to rollback, in case something goes wrong.
OTA programmer- Working
- In the OTA programmer project, the CH32V003_IAP program is uploaded to the BOOT section (1920B starting from addr: 0x1FFF0000) using the WCH-LinkUtility software.
- The pin connections are made as shown in the pin out diagram.
- The NodeMCU is flashed with the above NodeMCU sketch. Modify the “your_ssid” and “your_password” with your Hotspot’s ssid and password (note that the html files are not shown here, but can be referred from the github repository mentioned at the end of this document).
- Generate the “.bin” file for the program that needs to be flashed on CH32V003.
After the above steps,
- Connect the NodeMCU and a Host like smartphone or laptop, to a common Hotspot.
- Then, go to the NodeMCU’s IP address in any web browser.
- Click on the “upload” link to go to the file upload page. Choose your “.bin” file and hit the upload button. After a successful upload, it will say that the file is uploaded successfully.
- Go back to home page. Click on the “flash file” link to go to the flash file page.
- You should be able to see the uploaded “.bin” file. Select that and hit the Submit button.
- You should see a message that the file is being flashed.
- The NodeMCU’s blue LED will turn on indicating that the VSDSquadron-Mini is being programmed. Wait for a while, for the flashing process to complete.
- After the flashing process is completed, the board automatically reboots and you should be able to see that newly uploaded flash file is being executed.
Application Video:
Uploading code from a laptop
Uploading code from a smartphone
Github Repo:
https://github.com/VishnuPrakashBharadwaj/vsdsquadron-mini-internship